12/8/09

Contouring Cheeks - Let's talk face shapes

We'll start with an introduction to faces:

Oval Face
Length equal to one and a half times width.
Forehead is wider than the chin.
Prominent Cheekbones.
Face gracefully tapers to a narrow oval chin.

Round Face
Your face is as wide as it is long. This may vary a little but generally the measurement is close.
Face is widest at the cheeks.

Oblong
Longer than it is wide.
Forehead, cheekbones and jawline are all about the same width.
Can tend to have a prominent chin.
Has an elongated appearance.

Heart
Narrow at jaw line, wide at cheekbones/and or forehead.
Similar to oval, but the chin tapers to a point.

Square
Your face is about as wide as it is long.
Forehead, cheekbones and jawline all about the same width.
Squared jawline is the most obvious feature.


It is considered that the Oval face shape is the 'Ideal', now don't go throwing yourself off any tall buildings if you don't happen to have one... and don't get your plastic surgeon on Speed Dial quite yet. With contouring and hairstyle you can achieve the 'look' easily. We're going to focus on the makeup end of things...

Contouring an Oval (as well as Heart Shaped)Face:

First, start with a clean face. If you have blemishes or dry skin or other issues, try a mask, then moisturizer.
Then, apply a foundation that matches your skin tone. If you need to figure this out, I suggest going to your favorite makeup shop, the girls will get you set up. Apply evenly with a stippling brush or sponge (I love that Beauty Blender) Blend well, so that there's no line along your hairline or jaw.
Now that you have a 'blank canvas' you will want to use a dark (brown or at least several shades darker than your foundation) cream foundation or cream blush.

Using a flat wide brush ( I like this one from M.A.C - 191) make a 'swoosh' much like the Nike symbol starting at the temple and ending at the apple of your cheek, making sure to go slightly below or at the natural cheekbone. It will look harsh but that's where your blending skills come in. Blend down (however not too far, only enough to soften the line) and then blend up a little. Wipe off the brush and then use a white cream foundation to hi-lite the line above your 'Swoosh' You should see a natural looking shadow which defines the cheekbone rather than changing the shape or look of what you naturally have.


To soften the square face you can highlight the center of the forehead, under the eyes, and the very tip of the chin. Then, darken the hairline by the temples and the chiseled corners of the jaw.
The last step is to always powder your look so it has true staying power.
Contouring a Round (as well as Square) Face:

First, start with a clean face. If you have blemishes or dry skin or other issues, try a mask, then moisturizer.
Then, apply a foundation that matches your skin tone. If you need to figure this out, I suggest going to your favorite makeup shop, the girls will get you set up. Apply evenly with a stippling brush or sponge (I love that Beauty Blender) Blend well, so that there's no line along your hairline or jaw.
Now that you have a 'blank canvas' you will want to use a dark (brown or at least several shades darker than your foundation) cream foundation or cream blush. Using a flat wide brush ( I like this one from M.A.C - 191) make a straight line angled down from under the cheekbone at ear to corner of your lips (you can stop before the corner of your mouth, but try a couple of different lengths first to see which one looks most natural on YOUR face.. It will look harsh but that's where your blending skills come in. Blend the underside of the line (however not too far, only enough to soften the line) and then blend up a little. Wipe off the brush and then use a white cream foundation to hi-lite the line. You have now contoured your cheekbones to give them a more Oval looking shape thereby narrowing the roundness on the sides.

Contouring an Oblong Face:

First, start with a clean face. If you have blemishes or dry skin or other issues, try a mask, then moisturizer.
Then, apply a foundation that matches your skin tone. If you need to figure this out, I suggest going to your favorite makeup shop, the girls will get you set up. Apply evenly with a stippling brush or sponge (I love that Beauty Blender) Blend well, so that there's no line along your hairline or jaw.
Now that you have a 'blank canvas' you will want to use a dark (brown or at least several shades darker than your foundation) cream foundation or cream blush. Using a flat wide brush ( I like this one from M.A.C - 191) make a straight line from your cheekbone toward your nose. Many people assume you always 'blush' downward, however to give a fuller look to the Oblong face using a straight line across the cheek is the look you want to go for. It will look harsh but that's where your blending skills come in. Blend downward (however not too far, only enough to soften the line) and then blend up a little. Wipe off the brush and then use a white cream foundation to hi-lite the line above your dark straight line.

Your final step is to apply powder to set the makeup and give a finished look. Many people use a brush, however to get the powder to actually set the makeup, you should use a puff, or cotton ball. Place a small amount of powder in the palm of your hand using your applicator of choice, then rub it around a bit to get it evenly spread, and then dab or press around your face, lifting not sweeping as you go.

It can be as subtle or prominent as you like, remember the key is in the blending. Practice, be bold and keep trying. It's fun so go for it!!

12/3/09

Sabon - A rather lovely, sumptuous shop.


I am a product whore, as I keep trying to tell you, so I do not typically buy into product expansion by companies that specialize in one thing and make others to fill their shops. Like Sabon, which means 'soap' in Hebrew. They make soap, and they make it really well, but they also sell hand scrubs, body scrubs, candles, slippers, aromatherapy oils, shower gels and on and on and on. So I assumed that they were just like the rest. So when I went into Sabon with a few minutes to kill, wondering if they might have a scent I wanted in a room oil bamboo stick thingy, I was not readily interested when they said they only offered the Vanilla, Patchouli and Lavender in everything BUT what is actually known as Aroma Diffuser and not in fact room oil bamboo stick thingy.


But being my product whore self I braved it, for my readers mostly :P Ok, I loved the Body Oil spray, Body Lotion and um, well everything in that scent (I justified it as 'layering' the scent)


I then happened upon (ok I 'happened' upon the entire shop eventually) this Mud Mask, reminding me of my childhood and my mothers bathtub jar which was dusty as hell but fascinating. I asked for a sample when she told me it was from Dead Sea (again, why am I sucked in? No idea, as you may well have noticed, I LIVE in Israel. DUH, how hard is it to get Dead Sea ANYTHING?? not very.) I always ask for a sample because a. I have sensitive skin, b. I do not pay a lot of money without trying products first, c. if a company does not readily and happily give samples for products to be used on skin then run. and run fast. So then I asked about the other masks, she said the A&E was moisturizing so I said, "Well then, whats the Mud Mask all about?" This is when I learned that it was detoxifying and can be drying to some skin types, I said ok, give me a sample of the A&E then, since I am literally zapping myself with everything I touch(damn you,static electricity,) I figure a bit of moisture might not hurt.

After purchasing Shea Butter bar in lavender, Body Oil, Body Lotion in Patchouli, Lavender and Vanilla, Aromatherapy Oil for my burner in Ginger , I took home my 2 samples of masks and this is what happened:

Aside from making my daughter and boyfriend laugh (my son saw me put it on and thought I looked like a 'bad guy' wearing a 'good guy' mask - which made me laugh actually) it was great, simple and a touch gritty upon application, not an over powering scent which is nice, and smooth (despite the grittiness, go with me on this) It began to dry pretty quickly and evenly and was not overly tight and I did not feel dried out, I washed gently after I lost track of time, so lets go with 'awhile' and was actually surprised at how soft and even hydrated my skin felt. You know your skin is in deep shit when a mask that is 'drying' hydrates your desert for a face.... I approved and decided I would want to use this regularly AND spend a lot less than the 'product whore price' I would pay for an internationally known brand I usually use.


I decided to go big and spa-night and do the A&E mask as well. Ok, I should note that this is NOT what one should do when testing or sampling products, you are supposed to give your skin 24 hours to react to ONE product before adding another to the mix and making it impossible to know which you may have reacted to. Just sayin' - for your benefit since I clearly do not heed my own advice. So being a touch over eager and hoping for fab glowing skin, I went with the A&E mask. Oh Sabon, you fabulous folks you, this was SOOO moisturizing that it actually seemed to sweat moisture onto my face. If you do not know what I mean, well, in this case I am not even sure I can say it any more clearly. I know,I am totally useless, sorry. I left it on for ages again, or apporx 20-30 minutes and wiped it off with a damp cloth and then rinsed with only water and patted dry. OOOh, Ahhh, Oh yes, I am a happy moisturized girly girl, I am.


And if you laugh at my tired, but moisturized and deeply cleansed face without makeup... well, then you are simply mean and do not appreciate the sacrifices I make for my readers (all 3 of you) But yeah, feel free to laugh at the mask pictures. I did.

Next up, I will tell you how I ended up liking (or not liking) the Lavender, Vanilla and Patchouli products I purchased. (insert Law and Order sound byte here)

11/19/09

Review of Beauty Blender - makeup application with a sponge


Today I want to tell you about Beauty Blender with a long ass story to go with it. Of course I was drawn to it, its a pink egg for Pete's sake! But I thought it was over priced, 2 eggs and the cleanser and it ain't cheap! I visited Madina (Israeli cosmetic shop, they claim their makeup is made at the same place Dior is manufactured at in Italy... I say the proof is in the pudding, but more on that later) the other day, all fresh faced looking to purchase a concealer brush. I have one or two of their eyeshadows and by chance I happen to have met/know the gorgeous model who is their 'face' of the company, that's about it.


I know they have great brushes however, and the prices (for Israel) aren't too bad. The guy inside was busy with another customer so I perused their goodies. I like that they carry Evian spray and nail polish from Essie, the rest seemed a bit bland but ok. So after a while I discover the eyeshadow collection, find one I like and wait. and wait. Ok! so I can serve myself... and I do, only to have the guy wander over and warn me that the products are not testers. AND then check to see that I did not touch the one I pulled from the shelf. SHEESH, duh. I was ready to walk out... but then I played dumb. I had no makeup on and frankly my hair these days is a mess (another story.) so I looked like a good victim, I mean customer.


I told him I wanted to try the concealer brush so he brought out concealer (this is when he told me it was like Dior) and I was ready to go at that point but he loved that I had a great face for makeup and was clearly uninitiated into the makeup world (silly man) and went on to do my entire face. THIS is when I met Beauty Blender. He chose a foundation that I would have thunk was gonna be too dark, but lo and behold it wasn't! The Beauty Blender (and ok, I admit the foundation, too) ROCKED. It was so soft and applied the foundation so softly and evenly, it was super natural looking. I was kinda hooked. Then he went on to tell me how to contour my fabulous cheek bones (his words, not mine) and well, to keep this short; I got a whole lesson on how to apply natural makeup for day. LOL

I got HARD sold everything under the sun. Seriously, he took out all his guns. I attempted to be strong and bought only a few things. Beauty Blender Set, Foundation, a moisturizing lipstick in the palest of pink, a cream eyeshadow also soft pink to use as a base (yummy) the brush I came for (why does it always happen that I go for one thing and leave with too much??) and oh, the eyeshadow and some hair silicone for these dry ends (ugh!)
So... I tried the Beauty Blender on my friend and regular model, Talia. She likes to look very natural and was going to an evening wedding where she would be dancing, a lot. It was great, although it did not seem to use less product as he had suggested it would. Light, soft, natural and no issues with lines on the jaw. I used it on me next, and that's when I finally felt it had been worth the cashola. It was dreamy, in a word. And fast, no touch up needed.


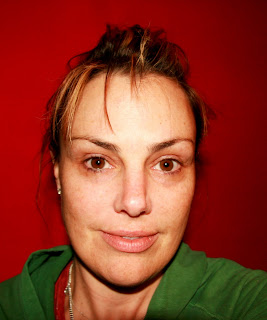
In the picture of me, you see that I applied foundation (with my handy dandy Beauty Blender Pink Egg) as well as adding blush to contour my 'fab' cheek bones. This is my BEFORE, as in before concealer, eyes, mascara, blush, lips and whatever else... but I did also apply the pink cream shadow as a base. I went on to get crazy and did a BIG version of my popular Mermaid eye.
So what do you think? Would you try the Beauty Blender? I love mine and am even thinking of giving it as Christmas gifts to my pals. What do you think of the Mermaid eye?

11/18/09

Juicy Grape - new handmade nail polish by ME!

Today I am introducing this new nail polish I created, Juicy Grape. You can do this yourself at home, I promise, it's super easy! I first made a blend of pigments - you can use your own pigments or loose eyeshadow


With my polish, I blended purple and black along with a secret blend of shimmer and color that I am sorry but I am not sharing with you... I know, I suck. (Glittersniffer Cosmetics makes an incredible line of affordable, handmade, vegan colors that POP!)

Once I had the color I wanted (which I can now also use on my eyes as well) I took a high-quality clear nail polish and poured some into a small disposable cup. Using a tiny spatula to scoop out the pigment, I blended the two together to achieve just the right consistency.

By the way, I used the same brush that comes in the clear polish bottle as you can clean it after without damaging or compromising the clear polish in the bottle. Just clean with nail polish remover and wipe off color.


Make sure to put a layer of clear polish on your ready to paint nails so that they will be smooth and also so as not to stain your nails from color. If you have time, I also suggest clipping your cuticles and putting on cuticle oil so your hands and nails look their best (which I did not take the time to do in these pictures - obviously) Then paint. Simple as that. Allow each layer to mostly dry, as you do not want to create bubbles on your pretty nails and then finally, after cleaning the brush, add clear top coat. Voila!

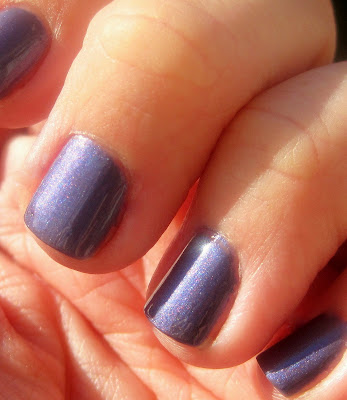
In the photos you can see the process, I first show you the actual polish, notice the high density of color and shimmer. Then I painted my nails, using 2 coats of the Juicy Grape. Then I added a final coat of clear nail polish to give it a high shine. I love the final product, it's rich and dense with tons of glittery shimmer!

11/12/09

Getting fishy with fun colors from Glittersniffer.


Ok, so I had so much fun with the Neutral colors, I had to go all Mermaid-y on ya! From one of our favorite gals, Glittersniffer cosmetics... I used Sammy Jo, Marva and another one which I don't have the name of just handy (Kush, maybe?). Sorry 'bout that. Then I used Urban Decay eyeliner in Deviant (blue) and Ransom (purple)
Same technique: I used Sammy Jo for the center, blended around it using Marva.

Playing with Fire - a M.A.C. lovestory

I used Coppering for the spot of fire, blended around it using Smut and in the crease I blended the two. Used Teddy eyeliner and Prep and Prime eyeshadow primer. M.A.C.
It was Ortal's idea, I put it into action. Love it!

Spent the day at M.A.C with my girl Ortal!


I am a product whore, I am a product whore, I am a product whore. It is simply a fact I cannot refute. Does it help that my friend Ortal is a make up artist in my Mecca? Not really. In fact, it is rather dangerous.


Friday is a preview party at M.A.C. and I got the lowdown. I could look but not touch all the new yummy-ness and let me assure you, it's goooooooood!
The sets are divine, you MUST get the one with the shimmer in Shimpagne Just sayin'. The new Dazzleglass in She-Zam, has my name on it. No really, back off chicky, it's MINE. The lipsticks are like WHOA. Let's just say a couple of them are serious bursts of fab color.
We played and she did my face (how can I resist a make up artist telling me what a perfect canvas my face is, with my cheek bones and my lips and those eyes... yup, I suckered right up to the chair) We used Plumage (which was then OUT OF STOCK, damn her) and Humid and Coppering and....


Damn girls, I almost forgot the NEW eyeliners coming out!! Grab 'em quick!! She did things with blush that made me see my face like it was all spankin' new! I took a couple of pics with the cell phone, and as you can see they are hardly worth posting but I wouldn't leave ya hanging...

I got D-Squared LipErase lip balm and fell in love, I got the Prep and Prime eyeshadow primer and LOVE it more than my Urban Decay Eyeshadow Primer Potion (although who can resist the adorable packaging) (there is an EXTRA large version now) and had to bodily remove myself from the store before I bought more brushes. I have an addiction, it's true.

I also started my Christmas shopping early and loaded myself down with bags from Toys R' Us, but thats just cuz' I'm such a good mama! :P